How to build a “Flower Tower”
 After the last of the winter has finally left us, a favorite pastime for my wife and I is to jump in her rag top and visit the local nurseries and greenhouses in our annual quest to buy seedlings for our hanging baskets. A few years ago we stumbled on an out of the way greenhouse that stocked the normal array of annuals, but had a really unique mix of perennials, water plants, and a variety of “different” ready made hanging baskets, and one item that really caught our eye, a “flower tower”.
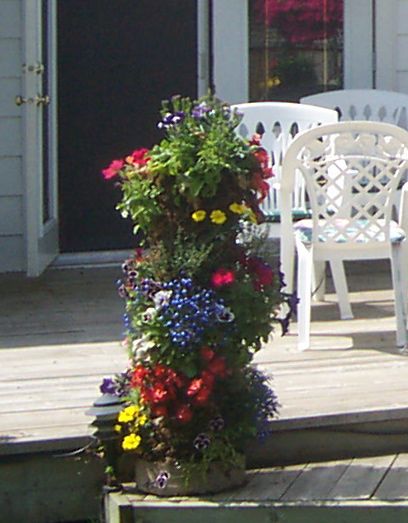
We ended up purchasing a couple that day, and enjoyed them immensely that summer. Colorful & vibrant with a mixture of pansies, lobelia, portulaca, ferns, geraniums and more, they grew to be very attractive “sentinels” on the edge of the steps to the deck. They sure elicited a lot of comments and admiration from all who visited, and that fall, as we winterized, we had a chance to see just how easily they were put together, and of course kept the towers intact so we could re use them next year, but this time with our own choice of plants, rather than the greenhouse’s.
The secret to their success is the use of a piece of perforated plastic sewer pipe that is in the center of the tower. This enables you to fill the pipe with water, and it’ll seep out through the perforations into the root zone of the plants, thus enabling a perfectly watered environment. It’s also a great way to get some nutrients to the plants, simply by dissolving a water soluble fertilizer into the water used.
What you need
- A slab of a tree trunk for the base, about 2″ thick and 18″ in diameter.
- Enough firm wire mesh to make a circle the size of the slab. This should be at least 1m tall.
- A piece of 2″ wide perforated plastic sewer pipe.
- Potting soil, heavily laced with moisture retaining material.
How to put it all together
More complete instructions are at Vertical Gardening – Bountiful Results from Small Spaces .
- Cut the mesh to make a circle about 1-2′ less than the slab’s diameter, then staple the wire “cage” securely to the slab.
- Lace the edges of the mesh with some flexible wire and make a firm circular cage.
- Place the sewer pipe in the center of the wire mesh cage and staple the bottom to the slab. Make sure its standing straight.
- Pack the space between the pipe and the cage firmly with your chosen potting soil.
It’s then a simple matter of stuffing a variety of bedding plants through the mesh and packing the soil around the root ball firmly. The tower will look a bit sparse in the first week or so, but once the plants have grown and spread a little, they’ll completely cover the entire mesh, resulting in a meter high mass of color. Daily watering is as easy as filling the pipe with your garden hose, and allowing it to seep through the perforations. Simple plant care tips, but essential ones.
Such a simple thing to put together and it’ll be the talking point of your garden – guaranteed.
Posts related to How to build a "Flower Tower"

If you live in a place that does not have a lot of room for gardening, then trying your hand a container gardening is the next best thing. Not only do you NOT need a ...

Gardening in the Winter? So, what on earth can you do in your garden in winter? For those fortunate enough to live in more temperate climates, winter gardening is a definitely a possibility, but when you have temperatures dipping into the ...

When I was a kid, watering the garden and patio plans was one of my favourite jobs in the heat of the summer (not so much in the winter!). I was always cautioned to water ...

I love spring! I love the smell of new growth, the sound of the birds returning, the ever lengthening days, the first glimpse of green appearing, the crocuses peeking out of the snow, and of ...

Constantly trying to keep my weight down as I do, I've found the best way, (apart from living by the rule, "if it tastes' good, spit it out"), regular exercise has been a big part ...


Bruce,
What a fantastic idea….I am going to give it a whirl next spring – I am currently looking outside to a yard full of snow so it will have to wait. My question to you is how you staple the sewer pipe to the base of the tree trunk?
I just bent about an inch of the mesh so it was flat to the board and used small fence staples, such as used by any farmer. I should mention to that I used a X section “spreader” at the very top of the mesh, made from pieces of lathe and this serves to keep the mesh nicely spread open.
Yep, it’s snowing here too…
~Bruce